5 Deadly linux commands list
Linux today is well known and well reputed one of the most powerful operating system.Linux user can perform numerous such tasks that a windows or Mac user can’t even imagine.

Sometimes Linux can go extreme upto the extent that it can do serious damage to the system.
Linux system dont even ask user for confirmation once the command is given and simply performs its task.
hardware of your computer within a few seconds.
hardware of your computer within a few seconds.
Because of these harmful activities of linux it is recommended to use it only if you are good at giving commands and have in depth knowledge oflinux commands list.
5 Deadly linux commands list that can Destroy one’s System
1. Command > rm -rf / = It will Delete Everything
Explanation : It is a combination of three keywords.
First is : rm It will remove all the files followed by this command.
Second is : -rf This will run rm command in more effective way and will remove everything ( all files and folders inside the specified folder )without asking confirmation from the user.
Third is : / This will start removing the data from the root directroy and will delete everything from the computer including the data of removable media.
2. Command > :(){ :|: & };: = Shell function that gets repliacated.
This command creates a shell function , which once get initialized starts to create multiple copies of itself.It results in taking quickly all the memory and power of CPU.It makes computer freeze or not responding. This is also known as Denial Of Service Attack.
3. Command > mkfs.ext4 /dev/sda1 = This command will format the hard disk
Explanation : This command is again composed of two keywords.
First is : mkfs.ext4 : This part of command will create a new ext4 file system on following device where this command will get executed.
Second is : /dev/sda1 ;This part of command specifies the 1st partition on the first hard disk which is probably in use by the user. Similarly, This Command > mkfs.ext3 /dev/sdb2 will Format the second partition on the second hard disk with ext3 File system.
4. Command > /dev/sda – Write Any content Directly to a Hard Drive.
Explanation : This command will execute normally as other commands in linux do. But output of this command will directly be sent to the file system (NTFS or FAT ) of the Hard Drive. It will result into damaging the file system of the computer.
5. Command > mv ~ /dev/null – Beware it Will Move your Home Directory To Black hole.
Explanation : Moving any of your content and data to following path : /dev/null means you want to destroy it.
It means /dev/null is a black hole where once anything sent , can not be recovered back.
Note:Many of these commands will only be dangerous if they’re prefixed with sudo on Ubuntu – they won’t work otherwise. On other Linux distributions, most commands must be run as root.
So these were 5 Deadly linux commands list that you must never try them on your system
Ubuntu 13.10: Is the update worth it?
After 6 months of speculations and waiting, the latest update to Ubuntu operating system i.e. Ubuntu 13.10 is finally in the market. It has been named as the “Saucy Salamander” by its developers. Like the previous updates to this operating system, this has also managed to turn heads due to its extensive user base which is about 20 million users across the world. We are still to decide if this upgrade was something worth the efforts or not.

Well, you can find out by yourself here. Below are the few changed or updates that have been brought in this latest version of Ubuntu operating system.
Everything You need to Know about Ubuntu 13.10
- Internet says “Ubuntu 13.10 is boring” : The verdict from tech bloggers, journalists as well as arm- chair critics describes the new Ubuntu 13.10 as boring. They were disappointed with the fact that there was no excitement in this upgrade. This upgrade has surely managed to bring new features in this OS but the sad truth is that these features are fewer in number than what we have seen in the older upgrades. Apart from this, there are many changes as well as improvements that have been introduced but may be they are too minor to be noticed by the users.
- A fuller dash : A considerably big draw of this upgrade is the Smart Scopes feature introduced by Unity. This feature gives power to the dashboard with the help of intelligent semantics. This intelligence draws information from every search that you make on the browser and integrates them onto the dash.While it may seen convenient to click on a key and get your browsing data in front of you, but actually it is more like a hindrance to the users. People use a number of search engines as well as browsers on their systems and it could get ugly when all this information is summed up at one place. The dash will certainly look like a wall that has been painted by some unprofessional artist.The good news is that while dealing with this chaos, there is scope for improvement as well. In this, the results are grouped by their “theme” and hence it is easier to look for information.All together, there is nothing interesting with this feature. There are efficient browsers like Google which has a better knowledge of what the users are trying to find on the internet.
- Turn scopes off : While the Smart Scopes feature is of no advantage to the users, there is province for turning it off. Either way, there are no major differences that you are going to notice with your upgraded version of Ubuntu.
- Ubuntu One login : The new Ubuntu installer comes with an extra login/sign in page. This page saves the need of configuring accounts after the installation is done.
- Indicator keyboard : In order to make it easier for the users to switch between multiple input languages, a new indicator keyboard is there.
- Apps : There are some apps that come preinstalled with this OS. These are the latest versions of Thunderbird, Firefox, Shotwell as well as Libreoffice. Apart from this, a latest version of Geary mail client is also included in this setup.
- Performance : There has been some maintenance in this upgrade for sure. This is due to the longer stay of Unity 7. Some users have claimed that improvements have been brought with this upgrade for sure.
- Conclusion: This latest upgrade to the Ubuntu OS is definitely a must try and is solid and reliable to use.
Step 1: Boot Up Linux
Once you've booted up BackTrack, logged in as "root" and then type:
- bt > startx
You should have a screen that looks similar to this.
Step 2: Open a Terminal
To become proficient in Linux, you MUST master the terminal. Many things can be done now in the various Linux distributions by simply pointing and clicking, similar to Windows or Mac OS, but the expert hacker must know how to use the terminal to run most of the hacking tools.
So, let's open a terminal by clicking on the terminal icon on the bottom bar. That should give us a screen that looks similar to this.
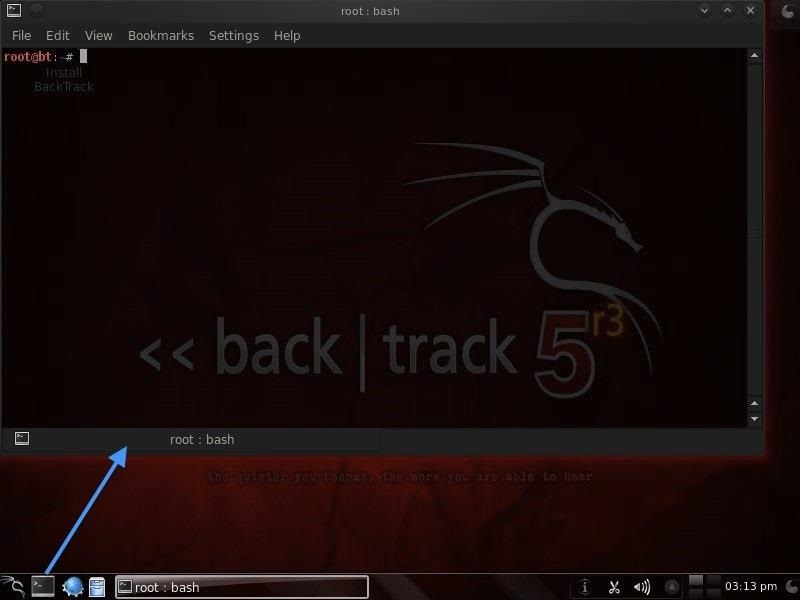
If you've ever used the command prompt in Windows, the Linux terminal is similar, but far more powerful. Unlike the Windows command prompt, you can do EVERYTHING in Linux from the terminal and control it more precisely than in Windows.
It's important to keep in mind that unlike Windows, Linux is case-sensitive. This means that "Desktop" is different from "desktop" which is different from "DeskTop". Those who are new to Linux often find this challenging, so try to keep this in mind.
Step 3: Examine the Directory Structure
Let's start with some basic Linux. Many beginners get tripped up by the structure of the file system in Linux. Unlike Windows, Linux's file system is not linked to a physical drive like in Windows, so we don't have a c:\ at the beginning of our Linux file system, but rather a /.
The forward slash (/) represents the "root" of the file system or the very top of the file system. All other directories (folders) are beneath this directory just like folders and sub-folders are beneath the c:\ drive.
To visualize the file system, let's take a look at this diagram below.
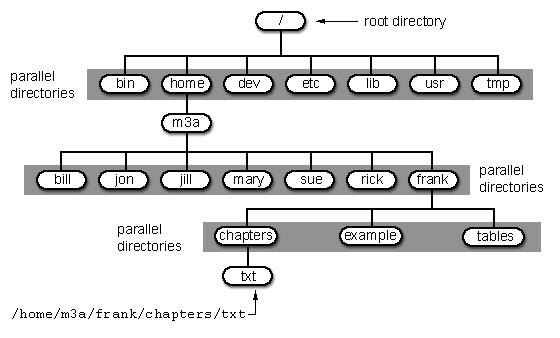
It's important to have a basic understanding of this file structure because often we need to navigate through it from the terminal without the use of a graphical tool like Windows Explorer.
A couple key things to note in this graphical representation:
- The /bin directory is where binaries are stored. These are the programs that make Linux run.
- /etc is generally where the configuration files are stored. In Linux, nearly everything is configured with a text file that is stored under /etc.
- /dev directory holds device files, similar to Windows device drivers.
- /var is generally where log files, among other files, are stored.
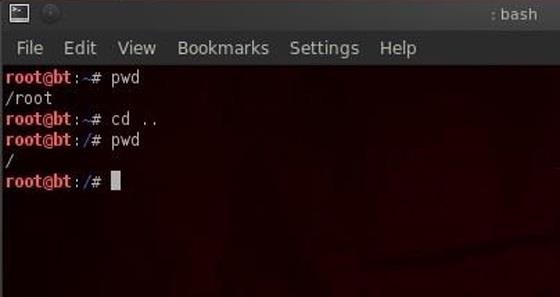
Step 4: Using Pwd
When we open a terminal in BackTrack, the default directory we're in is our "home" directory. As you can see from the graphic above, it's to the right of the "root" directory or one level "below" root. We can confirm what directory we are in by typing:
- bt > pwd
pwd stands for "present working directory" and as you can see, it returns "/root" meaning we're in the root users directory (don't confuse this with the top of the directory tree "root." This is the root users directory).
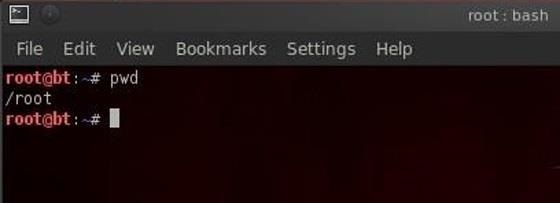
pwd is a handy command to remember as we can use it any time to tell us where we are in the directory tree.
Step 5: Using Cd Command
We can change the directory we're working in by using the cd (change directory) command. In this case, let's navigate "up" to the top of the directory structure by typing:
- bt > cd ..
The cd command followed by the double dots (..) says, "move me up one level in the directory tree." Notice that our command prompt has changed and when we type pwd we see that Linux responds by telling us we are in the "/" or the top of the directory tree (or the root directory).
- bt > pwd
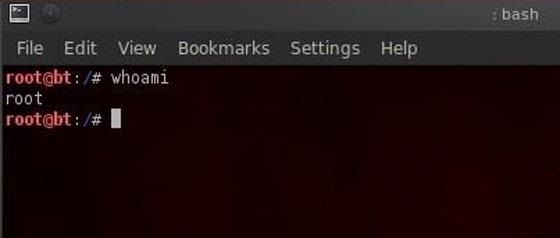
Step 6: Using the Whoami Command
In our last lesson of this tutorial, we'll use the whoami command. This command will return the name of the user we're logged in as. Since we're the root user, we can log in to any user account and that user's name would be displayed here.
- bt > whoami
That's it for now. In the next several tutorials, I will continue to give you the basics of Linux that you'll need to be a pro hacker, so keep coming back!
1. Command: sl (Steam Locomotive)
You might be aware of command ‘ls‘ the list command and use it frequently to view the contents of a folder but because of miss-typing sometimes you would result in ‘sl‘, how about getting a little fun in terminal and not “command not found“.
Install sl
Output

sl command
This command works even when you type ‘LS‘ and not ‘ls‘.
2. Command: telnet
No! No!! it is not as much complex as it seems. You would be familiar with telnet. Telnet is a text-oriented bidirectional network protocol over network. Here is nothing to be installed. What you should have is a Linux box and a working Internet.

telnet command
3. Command: fortune
what about getting your random fortune, sometimes funny in terminal.
Install fortune
4. Command: rev (Reverse)
It reverse every string given to it, is not it funny.
5. Command: factor
Time for some Mathematics, this command output all the possible factors of a given number.
6. Command: script
OK fine this is not a command and a script but it is nice.
7. Command: Cowsay
An ASCII cow in terminal that will say what ever you want.
Install Cowsay
Output
How about pipelineing ‘fortune command‘, described above with cowsay?
Note: ‘|‘ is called pipeline instruction and it is used where the output of one command needs to be the input of another command. In the above example the output of ‘fortune‘ command acts as an input of ‘cowsay‘ command. This pipeline instruction is frequently used in scripting and programming.
xcowsay is a graphical program which response similar to cowsay but in a graphical manner, hence it is X of cowsay.
Output

xcowsay command
cowthink is another command just run “cowthink Linux is sooo funny” and see the difference in output of cowsay and cowthink.
Output
8. Command: yes
It is funny but useful as well, specially in scripts and for System Administrators where an automated predefined response can be passed to terminal or generated.
Note: (Till you interrupt i.e ctrl+c).
9. Command: toilet
what? Are u kidding, huhh no! Definitely not, but for sure this command name itself is too funny, and I don’t know from where this command gets it’s name.
Install toilet
Output
It even offers some kind of color and fonts style.

toilet command
Note: Figlet is another command that more or less provide such kind of effect in terminal.
10. Command: cmatrix
You might have seen Hollywood movie ‘matrix‘ and would be fascinated with power, Neo was provided with, to see anything and everything in matrix or you might think of an animation that looks alike Hacker‘s desktop.
Install cmatrix
Output

cmatrix command
11. Command: oneko
OK so you believe that mouse pointer of Linux is the same silly black/white pointer where no animation lies then I fear you could be wrong. “oneko“ is a package that will attach a “Jerry“ with you mouse pointer and moves along with you pointer.
Install cmatrix
Output

oneko command
Note: Once you close the terminal from which oneko was run, jerry will disappear, nor will start at start-up. You can add the application to start up and continue enjoying.
12. Fork Bomb
This is a very nasty piece of code. Run this at your own risk. This actually is a fork bomb which exponentially multiplies itself till all the system resource is utilized and the system hangs. (To check the power of above code you should try it once, but all at your own risk, close and save all other programs and file before running fork bomb).
13. Command: while
The below “while” command is a script which provides you with colored date and file till you interrupt (ctrl + c). Just copy and paste the below code in terminal.

Linux while command
Note: The above script when modified with following command, will gives similar output but with a little difference, check it in your terminal.
14. Command: espeak
Just Turn the Knob of your multimedia speaker to full before pasting this command in your terminal and let us know how you felt listening the god’s voice.
Install espeak
Output
15. Command: aafire
How about fire in your terminal. Just type “aafire” in the terminal, without quotes and see the magic. Press any key to interrupt the program.
Install aafire
Output

aafire command
16. Command: bb
First install “apt-get insatll bb” and then, type “bb” in terminal and see what happens.

bb command
17. Command: url
Won’t it be an awesome feeling for you if you can update you twitter status from command line in front of your friend and they seems impressed. OK just replace username, password and your status message with your’susername, password and “your status message“.
18. ASCIIquarium
How it will be to get an aquarium in terminal.
Install ASCIIquarium
Now Download and Install ASCIIquarium.
And finally run “asciiquarium” or “/usr/local/bin/asciiquarium“ in terminal without quotes and be a part of magic that will be taking place in front of your eyes.

aquarium command
19. Command: funny manpages
First install “apt-get install funny-manpages” and then run man pages for the commands below. Some of them may be 18+, run at your own risk, they all are too funny.
20. Linux Tweaks
It is time for you to have some one liner tweaks.
Linux is sexy: who | grep -i blonde | date; cd ~; unzip; touch; strip; finger; mount; gasp; yes; uptime; umount; sleep (If you know what i mean)
There are certain other but these don’t work on all the system and hence not included in this article. Some of them are man dog , filter, banner, etc.
Have fun, you can say me thanks later :) yup your comment is highly appreciated which encourages us write more. Tell us which command you liked the most. Stay tuned i will be back soon with another article worth reading.